
(1.10.2019)
E-mail to arnfinn.christensen@gmail.com if you have comments/suggestions to improvements in this blog entry!
Declaration: This posting has a CGI (Cranky Geezer-Index) of 20.![]()
 The Spatial Audio mode records on three of the four available channels of Zoom H2N – a omnidirectional mono audio, left-right difference audio and front-rear difference audio.
This guide shows how to use the basics of ambisonics to convert and pan mono and stereo files manually – and record in the field with quite cheap equipment. It is based on self-education and my experience as a sound engineer.
Ambisonic sound is old, but has renaissanced with VR. You turn your head in the VR world – and the sound field turns accordingly. An example: A presenter stands at the center of your field of vision. Her voice comes from center too. You turn your head left, and she is to your right in your field of vision. The sound turns to the right too.The direction of image and sound still corresponds. That is the magic of ambisonics, made possible by a sound decoder in the VR mask. With ordinary stereo, the voice of the presenter would still come from center, even if you turn your head and she is elsewhere.
What do you need to create ambisonics in the most basic way? Actually – nothing special! You can record traditional stereo – even mono – and still make ambisonics where sound direction follows view direction. You can even use basic open source software like Audacity. How?
If you know all you need about ambisonics basics, go directly to the methods!
To understand what is happening, I will explain this type of basic ambisonics, called first order ambisonics, used in YouTube and most VR headsets. It uses only 4 channels of sound to generate the entire spherical sound field. 4 channels the basic minimum to achieve that. More advanced systems use more channels. Third order ambisonics, for example, use 16 channels.
Higher order ambisonics give more precise sound location, but my experience is that your vision makes up for the spatial blurriness of first order ambisonics. Once your eyes are fixed on your point of interest, your brain helps you fix the sound from that point precisely. Sound is less analytical than vision!
Here is the short definition of first order ambisonics for people who know some sound engineering. A more detailed explanation will follow for the rest.
First order ambisonics is like MS stereo, but with two additional channels for front-minus-rear difference signal and up-minus-down difference signal. The four channels are named
W – mono omnidirectional – that is sound from every direction equally strong, the M in MS X – front-minus-rear Y – left-minus-right, the S in MS Z – up-minus-down
If this made sense to you, skip the next indented paragraphs! They are elaborations for those of you who do not know MS-stereo.
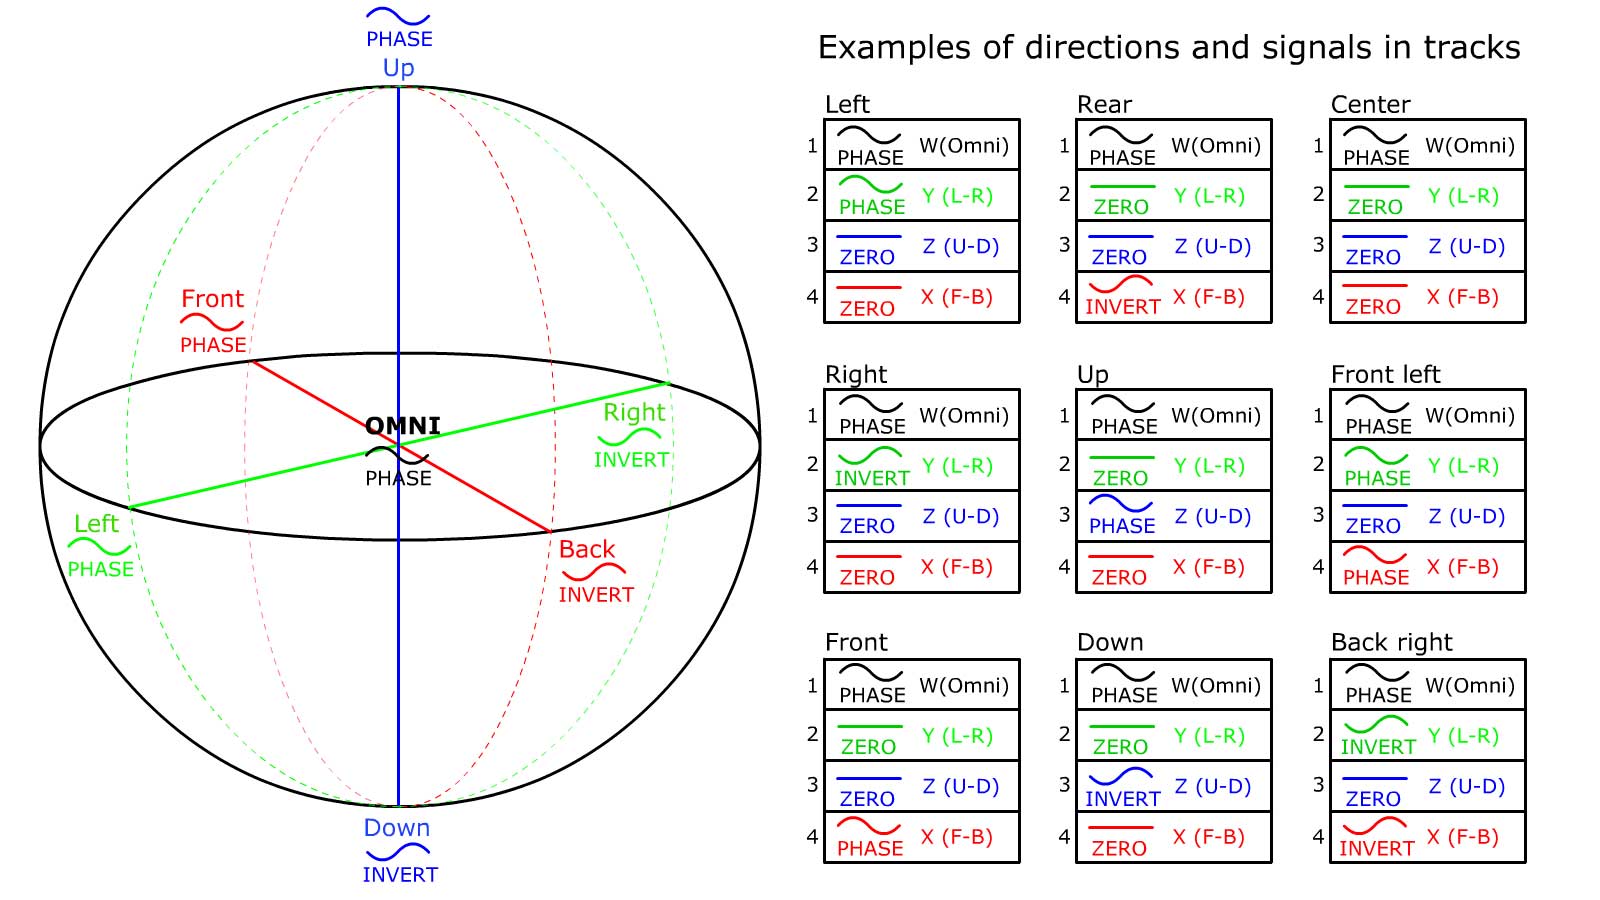 The signal phases of a mono signal in the principal panning directions and the four channel AmbiX tracks. Here, phase means a signal of 1, invert means -1 and zero means no signal.
An example: If you wanted a mono signal to start front center and move to back center, you would start with the signal in phase in channel 1 (W) and 4 (X), then – in channel 4 (X) – fade it out gradually to zero and fade the inverted signal gradually in again.
The signal phases of a mono signal in the principal panning directions and the four channel AmbiX tracks. Here, phase means a signal of 1, invert means -1 and zero means no signal.
An example: If you wanted a mono signal to start front center and move to back center, you would start with the signal in phase in channel 1 (W) and 4 (X), then – in channel 4 (X) – fade it out gradually to zero and fade the inverted signal gradually in again.
What actually is MS stereo and the «difference signal» S? Ordinary stereo is left channel and right channel. MS-stereo has one mono (M-) channel which is the sum of left and right channel, and one stereo (S-) channel which is the difference between the left and the right channel. Like this:
M = left + right S = left - right
To make ordinary left and right channels, you add the S-channel to the M channel to get left and subtract the S-channel from the M channel to get right. Like this:
Left = M + S = (left + right) + (left - right) = 2 left Right = M - S = (left + right) - (left - right) = (left + right - left + right) = 2 right
Don’t worry about the «2» left and right, that only means we get the double volume, which can be easily adjusted down again.
You may ask: How do one add and subtract sound channels, for example W+Y (left) or W-Y (right)? To add W + Y is easy – you just mix W + Y together to get a «sum» mono channel.
What about W - Y? Then, you must first make «minus Y». To do that, you «invert» Y. That means to turn the sound wave upside down, so that all wave tops in the original sound wave becomes wave-bottoms and vice versa. This can easily be done in any sound editing program by applying an «invert» to the Y signal. After inverting Y, you add the negative version of Y– mix it – together with «W» just like before, to get the difference mono channel. The same methods goes for W+X/W-X and W+Z/W-Z.
In B-format ambisonics, the same logic applies to the front-rear (X) and up-down (Z)-channels. To get «front», you will for example add X and W, and to get «rear», you will subtract X from W. To get «up», you add Z and W; to get «down», you subtract Z from W.
In YouTube and VR-applications elsewhere, the standard for first-order format ambisonics is called AmbiX. An AmbiX sound file is usually a wav-file with four channels. They are arranged like this:
W (omni, mono) – channel 1 Y (left-right) – channel 2 Z (top-bottom) – channel 3 X (front-rear) – channel 4
Note that the order is different from what would follow from alphabetical listing. This is important to get the right directions of sounds in the VR set.
So – how do you record AmbiX-Sound in the simplest possible manner? Easy. Let’s start with recording on location.
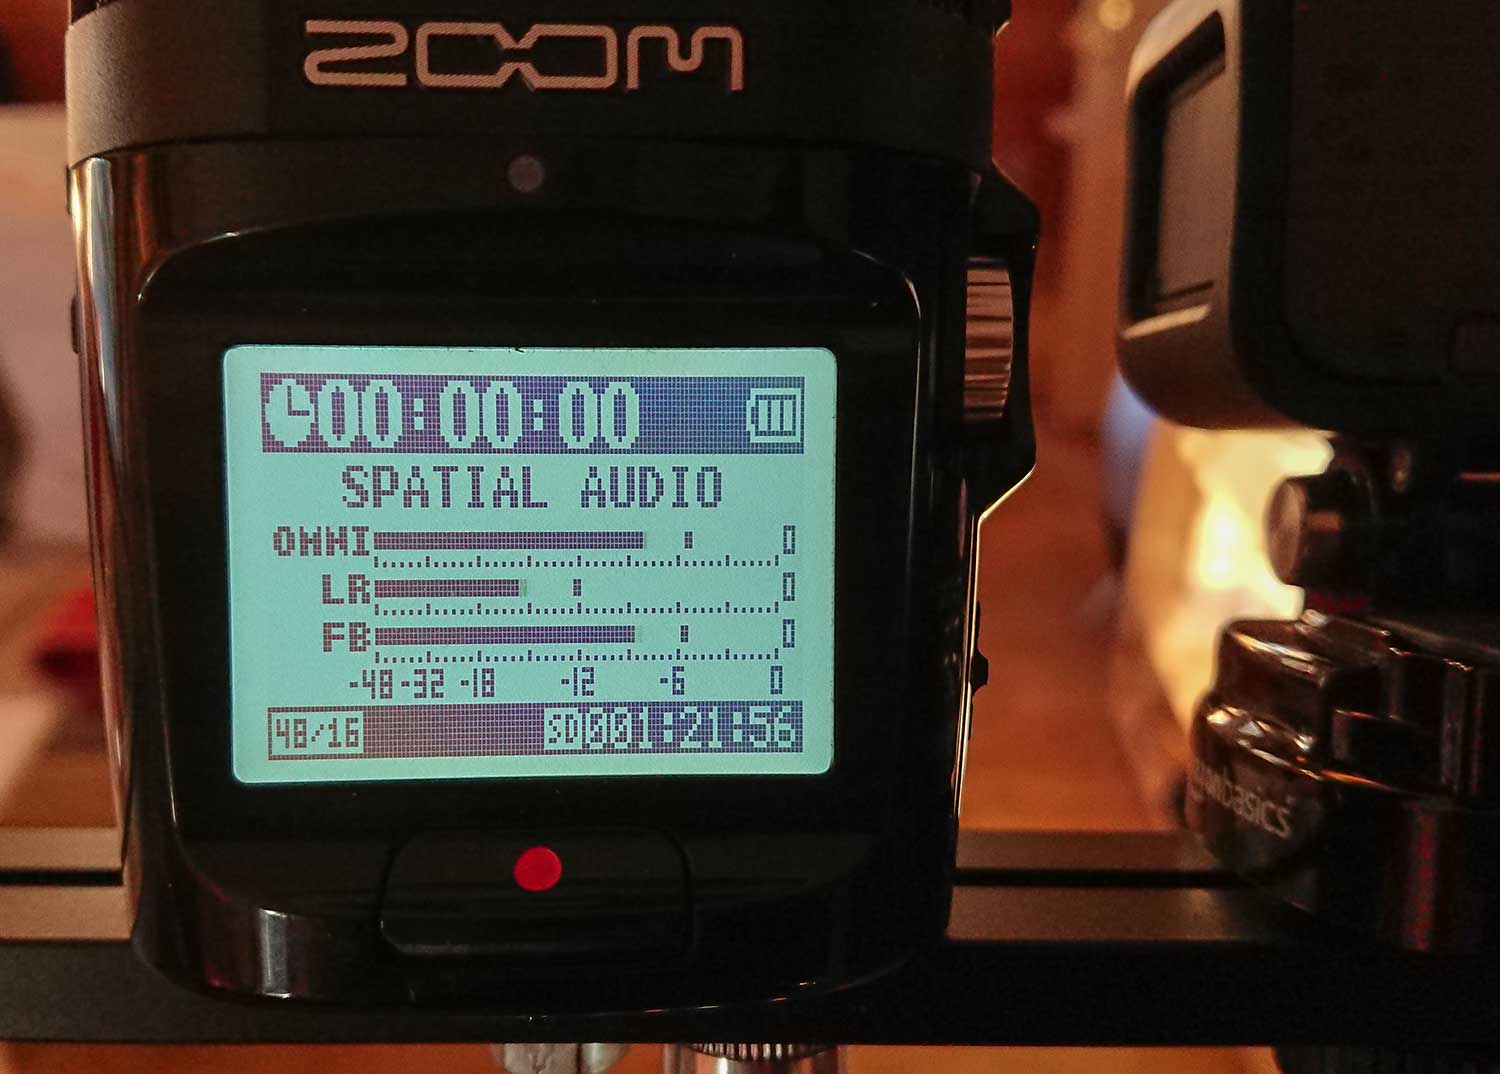
The cheapest way to AmbiX recording (and the one I use) is – at this time – to buy a Zoom H2N recorder. If the one you have is some years old, you need to update it´s firmware. Then, you move the recording wheel on the top in the «4 ch» position and in the menu select «Spatial audio» and wav 48 kHz sampling frequency as the recording format. (You can use 44.1 kHz too, but most editing of video is done in 48 kHz, and you may want to avoid sampling rate conversion.)
NB: To get the right sound directions, the LCD display of H2N should be toward the photographer, not toward the scene which is filmed. (Very convenient, to monitor levels and start/stop recording!)
Otherwise, front will be rear and left will be right. (This can be corrected if you have Premiere Pro, more on the use of Premiere below.)
What you get is a 4 channel AmbiX wav file – but channel 3 will always be empty. Why? Because H2N only records left-right and front-rear information, not up-down. In my experience, this is not a big loss. The sound experience you get is equal to cinematic 5.1 surround sound, which most find immersive and impressive enough.
Zoom has also released a new model that records height information too, that is – all four channels of the AmbiX format. The model is called H3-VR 360° VR-Audio Recorder.
The Zoom H2N and H3 gives you ready-made AmbiX sound files. But what if you want to incorporate ordinary mono or stereo files in your VR project?
Mono front-center
Suppose you have a presenter with a mono lavalier microphone. The presenter is right in the middle of the VR camera field, and you want to align the sound. Easy. Just make an empty 4-channel audio file. Then paste the mono signal into channel 1 and 4 (W and X).
Why will that work? Look at the definition:
Front: W + X = (front + rear) + (front - rear) = (1+1) = 2 front Rear: W - X = (front + rear) - (front - rear) = (1 - 1) = 0 rear
The presenter is in front, the sound is in front. What about left-right and up-down? There is no sound in the Y (left-right) and Z (up-down) channels.
Left: W+Y = (left + right) + (left - right) = (1 + 0) = 1 left Right: W - Y = (left + right) - (left - right) = 1 - 0 = 1 right
That is, left and right is equally strong – the sound is in center on the left-right axis. The same logic goes for up and down – they are equally strong, and the sound is in center for the up-down axis.
We have used directions like left, right and front, back, but those directions only have meaning in the recording situation and if the VR-user sits with the head pointed straight forward. The advantage of ambisonics is that these directions will change in accordance with head movements to follow the directions in the VR scene, as explained in the start of this blog entry.
Move left, and the voice will follow the image to the right, and eventually further around to your rear if you swivel even further. Nod down, and the voice will follow the image up.
The face of the presenter and the direction of the voice will always be aligned. That is the magic of ambisonics.
Mono – dead center
Sometimes, you do not want the sound to move at all. If you make a commentary, it should appear on the same spot however you move your head with the VR headset.
This can be done very easily. Just put the commentary in the W (omni) channel (channel 1 in AmbiX) and let all the three other channels be empty!
Then, the voice will always appear dead center, because there is no direction information whatsoever, neither left-right, front-rear or up-down.
Now, let’s move on with an ordinary stereo file. What you have, is a two-channel sound file with left and right channels. These, you need to convert to the W (omni) and Y (left-right) channels.
Here is how you do it:
First, reduce the level of the file -6dB. Remember the "2" when we added/subtracted the M and S signal? We don´t want to get a too strong signal in the following steps.
Mix left and right channel together into a mono file. (Now, the 6 dB volume reduction could be necessary.) This is your W channel. Invert right channel and mix left and right-inverted into a new mono file. This is your Y channel.
Paste the W channel into channel 1 of the 4-channel AmbiX wav-file. Paste the Y-channel into channel 2 of the 4-channel AmbiX file.
Now, you also have a choice whether the stereo sound should appear up-front or dead center.
If you want it up-front, paste the Y-channel into channel 4 (X-channel) of the AmbiX-file too. If you want it dead-center (neither front nor rear), do nothing more. Leave channel 4 empty.
When you listen to this stereo sound in the VR headset, the left-right stereo image will follow your head movements.
It will be like having an imaginary pair of stereo speakers in front of you (or to each side of you, if you leave channel 4 empty). When you move your head, the speakers will move accordingly in your sound field to align with the VR-image.
If you use ordinary stereo music, this is the way to mix it into the AmbiX sound field. Some may argue that the music should stay fixed left-right and not follow your head movements. To counter that argument, I would suggest that the VR-video is like a cinema, and that moving your head in a cinema also makes the loudspeakers move accordingly.
If you really want to have the music fixed, you cannot use this method. Then, you must use another ambisonic format with more than 4 channels, namely one with dedicated separate stereo channels. This is outside the scope of this article.
Adobe Premiere Pro has good support for VR video – both for visuals and sound. Here are some advices for trouble-free AmbiX editing.
First – set up Premiere to treat 4 channel AmbiX files correctly. Under Preferences/Timeline/Default Audio Tracks, select «Adaptive» from the «Multichannel Mono Media» drop-down menu.
Otherwise, your 4 channel AmbiX will distribute over separate audio tracks in the timeline instead of one 4-channel track.
Next, when you generate a new sequence, choose from the «VR»-folder of presets and any preset with «Ambisonics» in it´s name. Don’t worry if the visual parameters (frame-rate, size and 3D-standards) are wrong – they can be changed afterwards.
What is important, is that you get a sound track of the type «Adaptive». When you drag your 4-channel AmbiX file into this type of track, it will appear as one track in the timeline with four channels – as it should.
(You could also add such adaptive tracks to any sequence, if you ignored the VR sequence presets recommended above, so you are not lost in any case. But this is a simple way to get them readymade.)
You can mix many adaptive tracks of AmbiX-sound, just as any other audio multitrack editing. You can draw volume curves also to adjust levels dynamically, for example with fade-ins and -outs.
You can now also monitor the sound in ambisonics in Premiere. In the «Program»-window (output monitor window), right/control-click «Monitor Ambisonics». For best results, of course use headphones. The ambisonics-image will follow your pan/tilt if you also monitor VR-video in the same window with anaglyph red/blue glasses. («VR Video/Enable»)
There is one audio filter – Panner Ambisonics – that can rotate your AmbiX sound field around all three axes – pan/tilt/roll. This could be very useful if your AmbiX sound recorder (Zoom H2N or any other) has been misplaced in relation to your VR camera.
When you export your VR movies, it is very important to use the right preset. If you don´t, you risk that the file will be a null byte empty export.
For «Format», choose «H264», and for «Preset» (very important to get the right meta-data with your file and not get an empty file), choose one of the VR-presets with «ambisonics» in it´s name. Again, do not worry about visual parameter (stereoscopic/monoscopic), that can be changed in the other drop-down export menus later.
Also, for the «Audio»-parameters in «Export»:
For «Bitrate» choose «512 kilobit per second» (to make it YouTube-compatible) For «Channels», choose «4.0», not «Stereo» Under «Ambisonics», check «Audio Is Ambisonics».
Now, you are ready to enjoy the magic of ambisonics in your exported VR video.
Normally, Audacity is only set up to export two-channel stereo files. But you can change that.
Change «Preferences/Import-Export» from «Always mix all tracks down to Stereo or Mono channel(s)» to «Use custom mix».
Create four tracks for the W,Y,Z and X channels of AmbiX and edit them as explained above.
Choose «Export» and «wav» as format. You will get an extra dialog box showing you the assignment of the four tracks to the four channels of the wav file that is exported. Leave it as it is, because it by default assigns tracks in the same succession that you have them in your track layout.
2019 Arnfinn Sørensen. Public domain – but please credit source and include hyperlink.